Total Pageviews

Sunday, March 8, 2015

Weekend Project-
We have lived in this house for 8 years and I have always HATED my kitchen island.  It was a useless, worthless 3 x 3 piece of granite whose only purpose was to hold a decorative candle and a flower arrangement.  On Friday, I just decided I was going to Google/Pinterest some ideas and come up with a plan.  I love it when I get inspired to take on a new project, and I am NOT one to ponder and plan like most people do.  When I decide to do something, I jump right in.

Here is what I came up with and it took me about 8 hours of quality time to get the finished product. The rest of the weekend I spent running back to Lowe's or Home Depot to pick up an extra tool, stain, sandpaper, etc.  Thank GOODNESS, they are both within 5 miles from my home.

Here is the 'before' photo to show you exactly what I was dealing with...
The granite top weighs a TON, and I was not sure how I was going to lift it off.  Fortunately my neighbor's lawn guys showed up, so I sweet talked them in to coming over and carrying it out to my garage.  Perfect timing!


Early Saturday morning I headed to Home Depot with all my notes and list of items I would need to begin this project.
I told this Home Depot person what I was about to do and he stared at me for a moment, then said 'Ma'am,,,are you doing this yourself???'  (Little does he know....)
I had him cut 2 - 2"x8"x8' boards in half to measure exactly 48" long.  I made sure he knew to make allowance for the saw blade to take off a little more.  I have a saw at home and could easily have done this myself, but hey,,,Home Depot does not charge for cuts, and besides, it fits better in my Tahoe!


I made myself a shopping list before I headed to Home Depot, and decided, I might just need a new tool or two for my collection.  So, I bought my very own Router and band sander.  (I tend to walk the aisles in Home Depot like some folks like to do at the grocery store....I usually find something I 'can't live without'.  I LOVE that place!


....Oh,, and I bought me this really cool Pocket Jig.  I saw it when I was doing my research and decided it would fit nicely in my tool box. So easy to use and it adds a lot of stability when joining boards.

The Pocket Jig turned out to be VERY useful for this project.  I wanted to make sure that the planks stayed together snugly, and this was just the ticket.  I pre-drilled the holes in preparation for the part where I joined the boards.


Gorilla Glue....what can I say...I can say that whatever you put it on, you better be DARN sure that is where you want it..It is really strong!


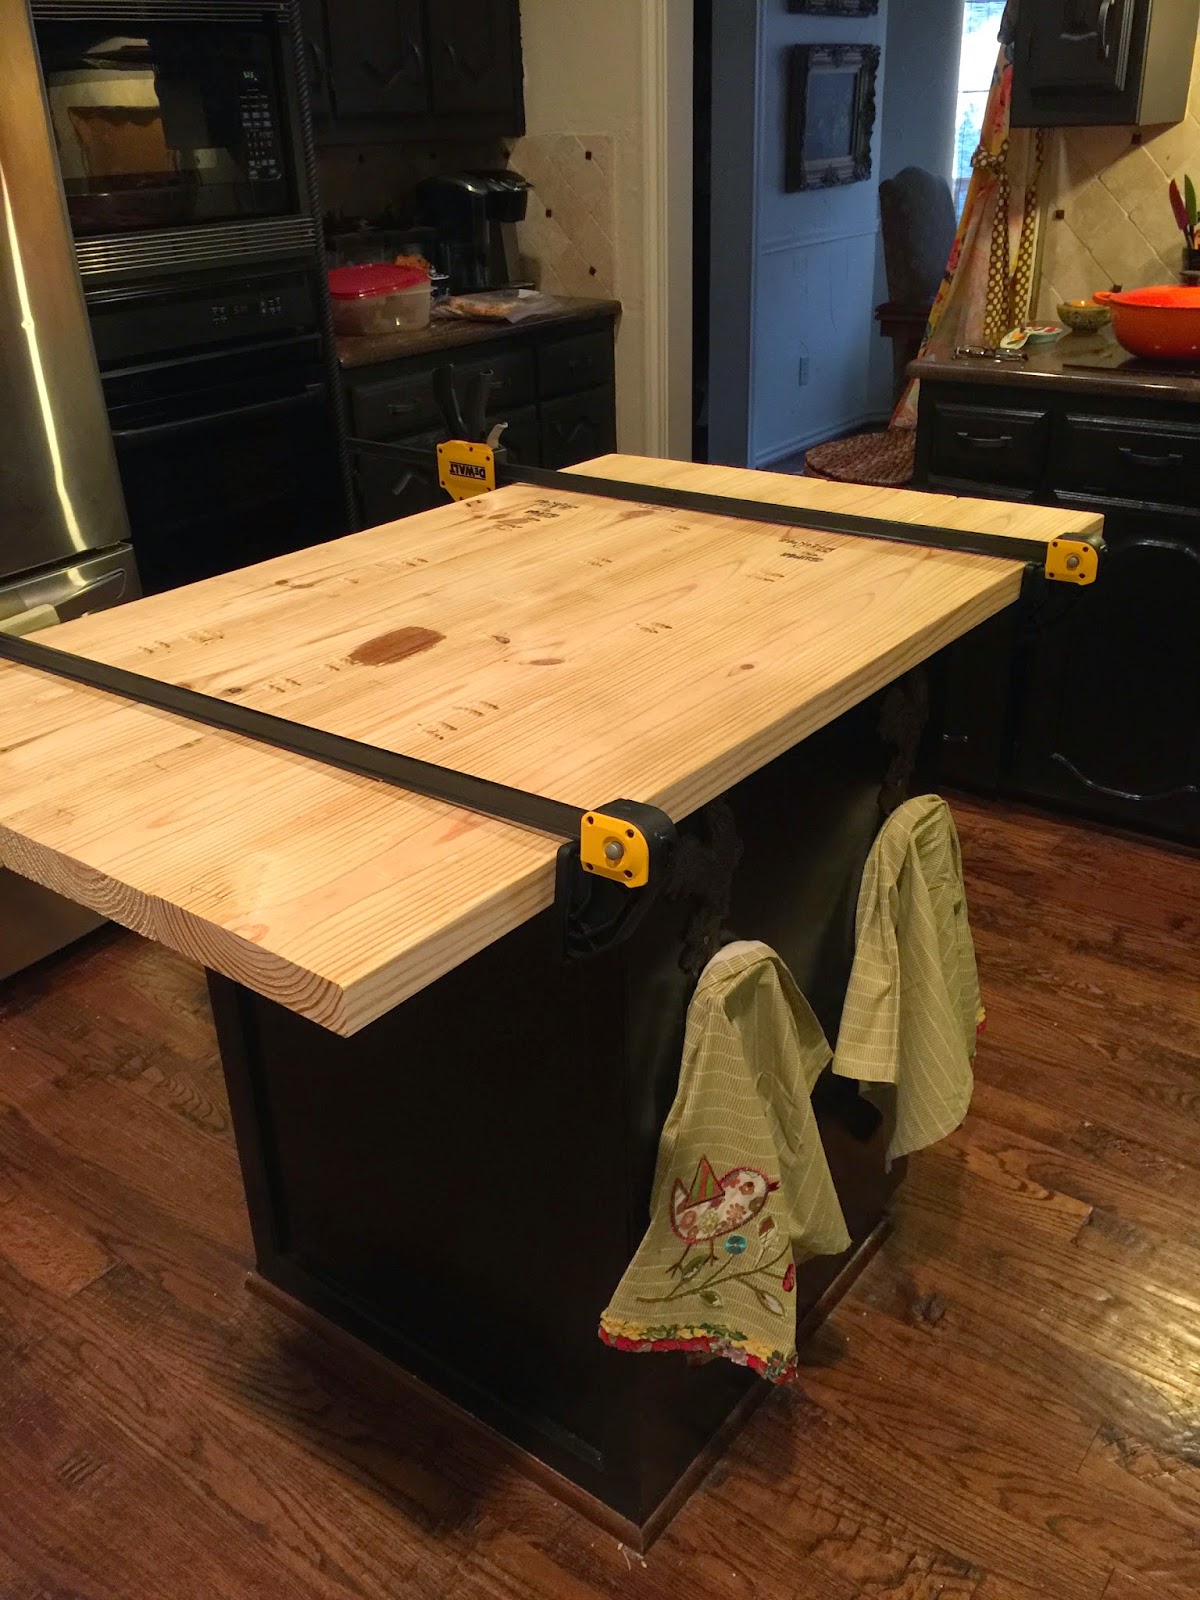
Here are the boards all glued together and clamped tight with the bar clamps.  I have to let it dry for 24 hours to make sure it stays put.  Off to watch a movie now,,,besides I'm pooped!


Here are the pre-drilled holes from yesterday.  Now that the Gorilla Glue has dried I am adding the screws as an added measure to keep the boards together.


This is the underside of the counter top.  I decided this was a good place to experiment with stain colors, and practice the wood distressing methods I found on the web.


To make the wood look old and create 'worm holes', I used a strip of wood and randomly screwed in 5 screws in one end of the strip.  I slapped the stick all over the island top to make these holes.  

We had this huge chunk of chain out in the garage, so I pounded the wood to death to create really big dents. 


This is the handy-dandy new tool I bought for ME.  A Ryobi Router.  this is the coolest tool ever and very easy to use. It's amazing how this simple, relatively inexpensive tool can transform a piece of wood. 

This is me after using the router.  Who KNEW that the teenie-weenie wood shavings would  blow out all over me, the kitchen, the living room,,,,,OMG,,,what a MESS!!!  Note to self----next time, the router stays OUTSIDE!!  This stuff was stuck everywhere.


This is not the HALF of it.  Shavings were everywhere..Cleanup took longer than the entire table top project!

...but look at that really cool edge...it was worth the mess.
Here's a close up shot of the 'worm' holes and the chain dents. Can't wait to see this after it is stained.
This is the stain I opted to use after experimenting with a couple of other stain colors on the underside of the island top.  It still maintains the integrity of the oak, but does not overpower.  Besides, I already have dark cabinets, and dark hardwood flooring, so I wanted to bring in a little contrast.

This photo gives you an idea of the before and after effect of the stain.  I really like how the stain pulls out all the beautiful detail of the wood grain. I used a sponge brush to apply and then as soon as I completed applying to the first plank, went back with a soft rag and gently wiped it off.  The longer you let the stain set, the more it soaks in to the wood.

I love how the stain brings out the dents and the 'worm' holes. I was not sure how this was going to turn out, but I love it.


I took this before and after shot of the knot-hole to give you an idea how effective the staining process is. It really accentuates the beautiful details of the wood.
This is where I had to do a little more research.  Some of the sites I read mentioned that using glossy lacquer finishes might 'yellow' over time, not to mention that they might not be safe for food preparation.  I decided to go with a wipe-on butcher block oil finisher.  I wanted to keep the island top on the 'old' side so figured this was the best option.  Time will tell if I made the right decision, but hey...I have a fabulous sander and I can always go back and change it.

Here is the island top after the stain and butcher block oil.  The overhead lights give it an 'orange' cast, but the photo below is really more like it.  I just wanted you to see the overall look.

While the butcher block oil was soaking in, I took a trip to Pier 1 Import and found these darling woven barstools on sale.  They were floor samples so I got a really good deal and they are the perfect height for the island.  I love that I have a new intimate seating area for a casual meal.

So there you have it....This was by far, one of the most fun projects I have done.  I can't believe I didn't think of this sooner.  It makes a huge difference in my very small kitchen.  


Sunday, March 1, 2015

Ode to Red Wine

www.facebook.com

I love cute little cocktail napkins.  Whenever I come across them I tend to buy a stash of them.  World Market has a great selection. Here are some of my favorites.

....say about 5:30 this afternoon maybe?...


Without a DOUBT!


I just don't have the heart to toss these...I'm sure I could cork an entire floor in my home.  This is only one stash.  I have a couple more. Fyi, you will see a lot of Noble Vine corks.  One of my all-time favorites is '337'.  It is rated 92 by Wine Spectator and it is generally under $10 per bottle.  Buy 6 and it is even less!  My kinda deal!


Oh,,,THOSE kind of glasses....Now I get it...


The first miracle in the Bible I must add...John 2:1-11  :)


 Need I say more??


Saturday, February 28, 2015


This is one of our nightstands BEFORE I got my hands on it.  Our bed requires the aid of a footstool to hoist in to it.  The nightstand was so low, I had to find a way to get it higher to match the height of the bed.  Soo....... 


.....with a little help from Pinterest, a trip to Lowes, and some creative risks, I put together a plan to make this work.  


I had to figure out a way to attach the new 'legs' because the nightstand on Pinterest was not quite the challenge this one was.  They only had to screw the new legs in to the bottom of the existing legs.  Too easy~
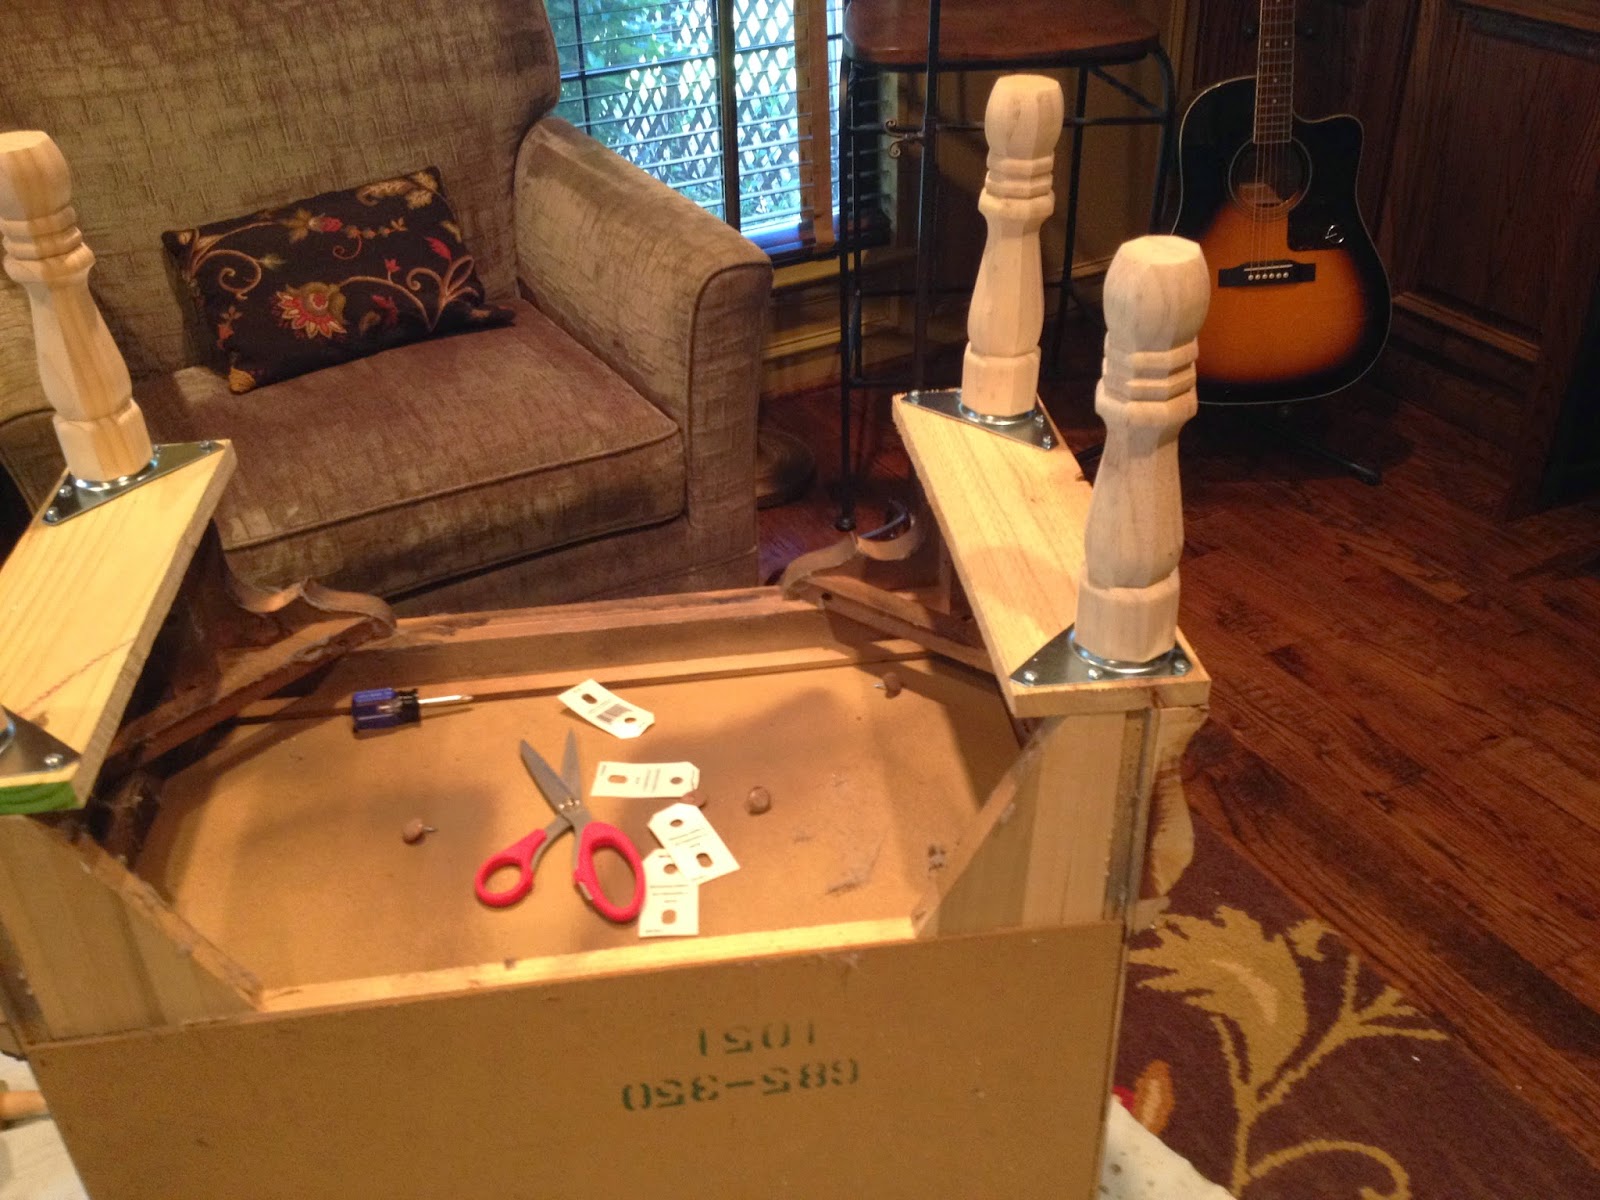
I had to rig a way to attach some 1 x 4 boards to the bottom to have a foundation to put the brackets and the legs.


Once the foundation was in place, I screwed in the corner brackets that the legs screw in to.


Now what??  look at the ugly part where the new legs join the old part...ICK


Back to Lowes to get some decorative trim to cover up the 'ugly'.  I LOVE Gorilla Glue...If you ever use it, you better be darn sure of what you are gluing down...it will NOT come apart once it is set.


Now the fun part....If you have never used Annie Sloan chalk paint, you don't know what you are missing.  It is the most forgiving, slap-it-on paint you will ever use.  Be careful though.  Once you discover this paint you will want to paint everything in sight.


Here is the finished product.  It only took about 2 hours to do two nightstands and now it is much more functional.  Ta-daaaaa

Saturday, January 31, 2015

OPEN

Where have I been for so long???  Well, life and work get in the way sometimes so while cleaning out some old folders, I ran across my blog.  It's a rainy Saturday morning and I am inspired to post some photos.  With the advancements of the Iphone, it is much easier to take random photos without having to haul my huge camera.

I found this old 'OPEN' sign at a flea market sometime ago.  It is so cool to sit out on my back patio with a glass of wine.  I feel like I am at a bar.  

Look at this gorgeous sunset!  Picture perfect!


I love the glow of my neon sign reflecting on my back patio.  So relaxing.  I have Sinatra playing through the outdoor speakers.  I'm ready for Spring weather so we can get back out there for Happy Hour.


Sunday, July 22, 2012

Healthy Dinner

I found the recipe for this yummy pasta dish in the September issue of 'Cooking Light'. I had most of the ingredients on hand and it was super easy to throw together. I love the crispy vegetables and the creamy sauce. I have been substituting almond milk in all recipes that requires. Almond milk is only 35 calories per cup and provides 50% more calcium than dairy milk and there are no added hormones.


Creamy Spring Pasta
3 Quarts water
2 ounces wheat bread crumbs
1 T butter
3 cloves garlic (divided)
1 1/2 cups diagonally sliced asparagus
1 cup frozen green peas
6 oz fresh fettuccini
2 tsp olive oil
1/3 cup chopped sweet onion
1 T flour
1/4 cup fat free, low sodium chicken broth
1 cup 1% milk (this is where I substituted Almond milk)
3 oz reduced fat cream cheese (I omitted this accidentally but it was good anyway.  What the heck?  Fewer calories!)
1/4 parmigiano cheese
1/2 tsp kosher salt
1/4 tsp freshly ground pepper
2 T fresh chopped tarragon

Bring 3 qts water to boil

Meantime melt butter in skillet and brown 1 garlic clove and add bread crumbs and saute til brown.  Remove bread crumbs and wipe pan clean with paper towel.

Add asparagus and peas to boiling water for 2 minutes and then remove with a slotted spoon and rince under cool water.

Add pasta to boiling water and cook for 10 minutes.

Heat olive oil in skillet and saute remaining garlic and onion.  Mix flour and chicken broth with a wisk and add to onion mixture along with milk.  Remove from heat and add cheese, salt, pepper and stir until cheese melts.  Add pasta, asparagus, peas and toss well.  Sprinkle with breadcrumbs and fresh tarragon and serve immediately.

For the carrots, I just peeled and sliced diagonally and spritzed olive oil, salt, and pepper and roasted for about 30 minutes at 425 degrees.


Sunday, July 15, 2012

BLING

Another one of my craft moments.  I saw some of these in an antique store in East Texas and decided to try my own version.  These are so fun to make and very easy.  It just takes a little patience stringing the beads on the wire and getting them arranged just the way you want them.

First, I purchased some salad spoons and forks from Bed, Bath, and Beyond for just under $3.


I used some beading wire and beads that I had on hand and a couple of wire cutters for trimming.


There is a hole in the top of the handle that you feed the wire through and twist over and over again to secure. 
First, start adding a couple of beads at a time, wrap the wire around a couple of times to secure, then add a couple of more beads, wrapping the wire around the utensil a couple of times every time you add beads.  Keep adding until you get within about 3" from the bottom of the handle.


I made myself this blingy cake server which was the first thing I made.  I wanted to make sure I could do this before I started making them for my friends. 


I made this salad serving set for my friend for her birthday.  It was so easy and super fun to make.  I will be making more.  There are so many beads to choose from and you can just mix and match and create your own unique set. 


By the way, I am totally addicted to Pinterest, so don't be surprised if you start seeing some of my favorite things posted.  I have a whole list of fun things to try so stay tuned.